


When embarking on a renovation project that involves tile installation, selecting the right tile clips becomes a critical decision that can significantly impact both the quality and efficiency of your work. Tile clips serve as essential components in modern tiling systems, providing precise alignment and consistent spacing between tiles during the installation process. These innovative tools have revolutionized the way professionals and DIY enthusiasts approach tile laying, offering improved accuracy and reduced labor time compared to traditional methods.
The importance of choosing appropriate tile clips extends beyond mere convenience, directly affecting the long-term durability and aesthetic appeal of your finished project. Poor quality or incorrectly sized tile clips can lead to uneven surfaces, lippage issues, and compromised grout lines that detract from the overall appearance of your installation. Understanding the various factors that influence tile clip selection will help ensure your renovation achieves professional-grade results while maintaining cost-effectiveness and installation efficiency.
Understanding Different Types of Tile Clips
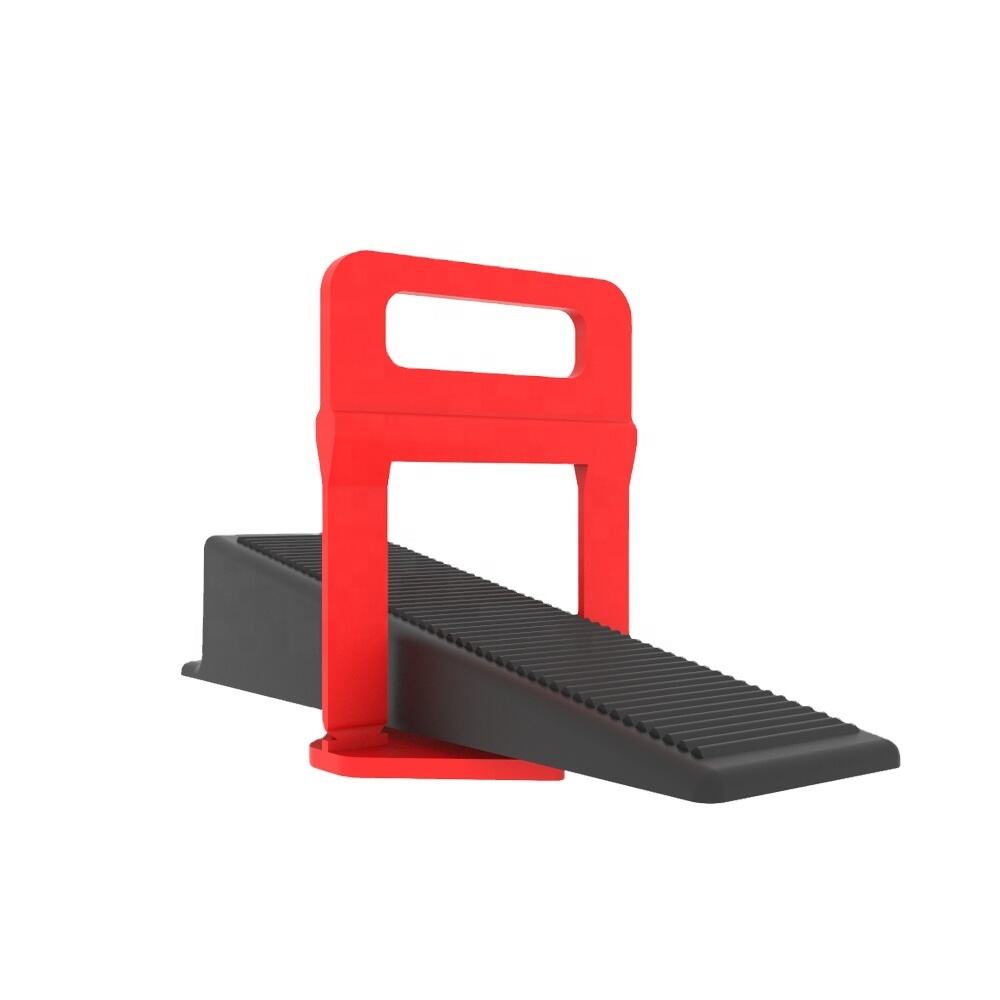
Standard Wedge-Style Tile Clips
Standard wedge-style tile clips represent the most commonly used type in residential and commercial applications. These clips feature a wedge mechanism that applies downward pressure to keep tiles level while the adhesive cures. The design typically includes a base plate that sits beneath adjacent tiles and a removable wedge component that can be easily extracted once the installation is complete. This type of tile clip system works effectively with tiles ranging from 3mm to 15mm in thickness, making them versatile for various project requirements.
The effectiveness of wedge-style tile clips depends largely on the quality of materials used in their construction. High-grade plastic or composite materials ensure consistent performance and reduce the risk of breakage during installation. When evaluating these tile clips, consider the wedge angle and grip strength, as these factors directly influence the leveling force applied to your tiles. Professional installers often prefer wedge-style systems because they provide reliable results across different tile materials and surface conditions.
Threaded Adjustment Tile Clips
Threaded adjustment tile clips offer enhanced precision through their mechanical adjustment capabilities. These systems utilize a threaded mechanism that allows fine-tuning of the leveling pressure applied to each tile. The adjustable nature of these tile clips makes them particularly suitable for challenging installations where substrate variations or tile thickness discrepancies require careful compensation. Many professional contractors choose threaded systems for high-end projects where perfect alignment is paramount.
The primary advantage of threaded tile clips lies in their ability to accommodate varying tile thicknesses within a single installation. This flexibility proves invaluable when working with natural stone or handmade tiles that may have slight dimensional variations. The mechanical advantage provided by the threaded system also allows for greater leveling force when needed, ensuring consistent results even with heavy or large-format tiles that require additional support during curing.
Material Quality and Durability Considerations
Plastic Composition and Strength
The plastic composition of tile clips plays a crucial role in their performance and longevity during installation. High-quality tile clips are typically manufactured from engineering-grade polymers that resist cracking, splitting, or deformation under pressure. These materials maintain their structural integrity throughout the installation process, ensuring consistent leveling performance from the first tile to the last. Lower-grade plastics may fail prematurely, leading to installation delays and potential tile damage.
When evaluating plastic quality in tile clips, consider factors such as UV resistance, temperature stability, and chemical compatibility with adhesives and grouts. Premium tile clips often incorporate additives that enhance durability and prevent degradation when exposed to alkaline conditions commonly found in tile adhesives. The color consistency and surface finish of the plastic can also indicate manufacturing quality, with uniform appearance suggesting better quality control in the production process.
Metal Component Reliability
For tile clips that incorporate metal components, such as springs or adjustment screws, the quality and corrosion resistance of these elements become critical considerations. Stainless steel components offer superior durability and resist corrosion even in moisture-rich environments typical of bathroom and kitchen installations. The metallurgy and heat treatment of spring components directly affect their ability to maintain consistent tension throughout the installation process.
Metal fatigue resistance is particularly important for tile clips that will be reused across multiple projects. High-quality metal components maintain their spring characteristics and adjustment precision through repeated use cycles. When examining tile clips with metal elements, check for proper finishing, smooth operation of moving parts, and absence of sharp edges that could damage tiles or cause injury during handling.
Size and Compatibility Requirements
Tile Thickness Compatibility
Proper tile thickness compatibility represents one of the most fundamental considerations when selecting tile clips for your renovation project. Different clip systems accommodate specific thickness ranges, and choosing incorrectly sized clips can result in ineffective leveling or inability to achieve proper tile alignment. Most residential applications involve tiles ranging from 6mm to 12mm thickness, requiring tile clips designed for this standard range. However, larger format or specialty tiles may require clips capable of handling thicknesses up to 20mm or more.
The relationship between tile thickness and clip performance extends beyond simple compatibility to include considerations of leverage and clamping force distribution. Thicker tiles require tile clips with greater mechanical advantage to achieve effective leveling, while thin tiles need gentler pressure to prevent cracking or damage. Some advanced clip systems offer adjustable thickness accommodation, allowing a single clip type to work effectively across a broader range of tile dimensions.
Joint Width Requirements
Joint width compatibility is another critical factor that influences tile clip selection for renovation projects. The spacing between tiles, determined by both aesthetic preferences and technical requirements, must align with the clip system's design parameters. Standard tile clips typically accommodate joint widths ranging from 1.5mm to 3mm, which covers most residential and commercial applications. However, specialty installations may require wider or narrower joints, necessitating specific clip designs.
The precision of joint width control directly impacts the final appearance and structural integrity of the tile installation. Consistent joint spacing ensures proper grout coverage and prevents weak points that could lead to future failures. When selecting tile clips for projects requiring specific joint widths, verify that the clip design maintains spacing accuracy throughout the installation process and accommodates any substrate movement or settling.
Installation Environment Factors
Substrate Conditions and Preparation
The condition and preparation of your substrate significantly influence the effectiveness of tile clips during installation. Properly prepared substrates provide the stable foundation necessary for clip systems to function optimally. Uneven or poorly prepared surfaces may require additional preparation work or specialized clip systems designed to accommodate minor substrate variations. The substrate material itself, whether concrete, plywood, cement board, or other materials, can affect adhesive cure times and clip removal timing.
Moisture conditions in the substrate and surrounding environment also impact tile clip performance and installation procedures. High humidity environments may extend adhesive cure times, requiring tile clips to remain in place longer than typical installations. Conversely, very dry conditions can accelerate curing, potentially making clip removal more challenging if not timed properly. Understanding these environmental factors helps in planning clip removal schedules and ensures optimal installation results.
Temperature and Humidity Considerations
Temperature and humidity conditions during installation directly affect both tile clip performance and adhesive behavior. Extreme temperatures can cause thermal expansion or contraction in both tiles and clip materials, potentially affecting alignment precision. High temperatures may accelerate adhesive curing, reducing the working time available for tile adjustments and clip positioning. Cold conditions can slow curing processes and may make plastic tile clips more brittle and prone to breakage.
Humidity levels influence adhesive performance and can affect the timing of clip removal procedures. High humidity environments typically extend cure times, while very dry conditions may cause rapid moisture loss from adhesives, potentially affecting bond strength. Professional installers often monitor environmental conditions and adjust their tile clip procedures accordingly, ensuring optimal performance regardless of installation conditions.
Cost-Effectiveness and Value Analysis
Initial Investment Versus Long-Term Benefits
Evaluating the cost-effectiveness of tile clips requires considering both initial purchase costs and the long-term benefits they provide. While quality tile clips may represent a higher upfront investment compared to traditional spacing methods, they typically deliver significant value through reduced labor time, improved installation accuracy, and fewer callbacks for lippage corrections. The time savings achieved with efficient clip systems often justifies the additional cost, particularly on larger projects where labor represents the majority of installation expenses.
The durability and reusability of tile clips also factor into their overall value proposition. High-quality clips that can be used across multiple projects provide better long-term value than single-use alternatives. When calculating cost-effectiveness, consider factors such as clip lifespan, reuse potential, and the impact on overall project timeline. Professional installers often find that investing in premium tile clips systems pays dividends through improved efficiency and customer satisfaction.
Project Scale and Clip Quantity Planning
Proper planning of tile clip quantities based on project scale helps optimize both costs and installation efficiency. Most manufacturers provide coverage guidelines that help estimate the number of clips required for specific square footage areas. However, these estimates should be adjusted based on tile size, layout complexity, and installer experience level. Ordering adequate quantities prevents installation delays while avoiding excessive inventory costs.
Bulk purchasing options often provide significant cost savings for larger renovation projects. Many suppliers offer quantity discounts that can substantially reduce per-unit costs when ordering tile clips in larger quantities. However, balance these savings against storage requirements and the risk of product obsolescence if clips remain unused for extended periods.
Professional Installation Tips and Best Practices
Proper Clip Placement Techniques
Mastering proper clip placement techniques is essential for achieving optimal results with any tile clip system. The positioning of clips along tile edges affects both leveling effectiveness and ease of removal after curing. Generally, clips should be placed at regular intervals along tile edges, with spacing determined by tile size and weight. Larger tiles typically require more frequent clip placement to ensure consistent support and leveling across the entire surface.
The angle and orientation of tile clips during placement can significantly impact their effectiveness. Proper insertion ensures maximum contact with tile surfaces and optimal force distribution. Experienced installers develop techniques for rapid clip placement that maintain consistent positioning while maximizing installation speed. Training and practice with specific clip systems improve both efficiency and results quality.
Timing and Removal Procedures
The timing of tile clip removal represents a critical aspect of successful installation procedures. Removing clips too early, before adequate adhesive cure, can result in tile movement or misalignment. Conversely, waiting too long may make removal more difficult and potentially damage tiles or grout lines. Understanding adhesive cure characteristics and environmental factors helps determine optimal removal timing for different installation conditions.
Proper removal techniques minimize the risk of tile damage while ensuring clean grout line preparation. Most tile clips are designed for easy removal when timing is appropriate, but technique still matters for achieving best results. Professional installers often develop systematic approaches to clip removal that maintain installation momentum while ensuring quality outcomes.
FAQ
What tile thickness range do most standard tile clips accommodate?
Most standard tile clips are designed to accommodate tiles ranging from 3mm to 15mm in thickness, with some specialized systems handling up to 20mm. The specific range depends on the clip design and manufacturer specifications. Always verify compatibility with your specific tile thickness before purchasing to ensure proper performance and leveling effectiveness.
How many tile clips are typically needed per square meter of installation?
The number of tile clips required per square meter varies based on tile size and layout, typically ranging from 12 to 24 clips per square meter. Larger format tiles generally require fewer clips per square meter, while smaller tiles need more frequent clip placement. Factor in approximately 10-15% extra clips to account for breakage and ensure adequate supply throughout installation.
Can tile clips be reused across multiple projects?
High-quality tile clips can often be reused across multiple projects when removed carefully and stored properly. The reuse potential depends on the clip material quality, installation conditions, and removal technique. Inspect clips for cracks, wear, or deformation before reuse, as damaged clips may not provide consistent leveling performance.
What happens if tile clips are left in place too long after installation?
Leaving tile clips in place beyond the recommended removal time can make extraction more difficult and may require additional force that could damage tiles or grout lines. Extended curing may also cause adhesive to bond with clip components, making clean removal challenging. Follow manufacturer guidelines for removal timing to avoid these complications and ensure optimal installation results.